A chess bag for my brother
September 17, 2008
My brother lives in NYC, and he and his roommate occasionally take a chess set down to the local bar and play. Aside from thinking they were cool to do that, this news made me think many things – that game boxes are hard to carry, that spilled beer would warp one of those cardboard game boards, and that I'd been seeing lots of "checkerboard" sort of quilting patterns recently. So I took some of the remnant cotton print fabric from the Olympic Mountains quilt, and made him a chess bag.
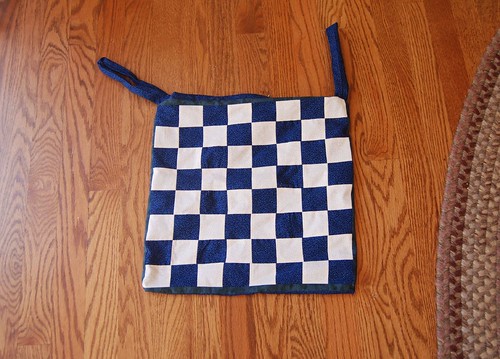
It's machine washable and dryable. It has a zipper and a lined pouch to hold all of the pieces.

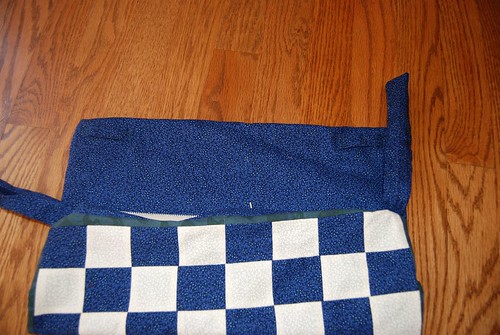
And there are two handles, which can slide into fabric slots to fold the bag in half and make it smaller/easier to carry.
I'm pretty pleased with the way it turned out. The bag, lying flat, is about 14½" square. Dave got it last week, and actually seemed quite pleased about this little bit of unsolicited crafting. And at least even if it only gets used occasionally, it's tiny to store. :-)
Mostly for my reference, since I'm sure I'll find occasion to make this again:
To make a zippered chess bag:
Materials:
Steps:
It's machine washable and dryable. It has a zipper and a lined pouch to hold all of the pieces.
And there are two handles, which can slide into fabric slots to fold the bag in half and make it smaller/easier to carry.
I'm pretty pleased with the way it turned out. The bag, lying flat, is about 14½" square. Dave got it last week, and actually seemed quite pleased about this little bit of unsolicited crafting. And at least even if it only gets used occasionally, it's tiny to store. :-)
Mostly for my reference, since I'm sure I'll find occasion to make this again:
To make a zippered chess bag:
Materials:
- 9" x 18" light fabric for the light checks
- 9" x 18" dark fabric for the dark checks
- 4 1"x15" strips accent fabric
- 15"x15" fabric for the back
- 15" by 28" fabric for the lining
- Zipper (12" or cut to 12")
- Bias tape or 2" strips ironed in half for handles.
Steps:
- Take your light and dark check panels. Cut 4 strips in each color: 2¼ x18.
- Sew together alternating strips to form a striped rectangle (14¼x18”) . Press. (Note that all seams were ¼".)
- Turn the rectangle and cut 7 times against the stripes to make 8 multicolor strips that are 2 ¼” wide.
- Lay these strips in an alternating fashion to for a checkerboard.
- Sew strips together. Press.
- Add a border of accent fabric. Press. The top is now complete.
- Place the checkerboard top and the plain back right sides together. Fold the lining around them, right side facing out, and seam along the lining fold. You now have a clean seam along the bottom of the bag. The whole ensemble looks kind of like a book with a cover and two pages.
- On the edge opposite the seam, sew the zipper. Turn each half inside-out to sew. Use pins. I added a strip of fabric with each seam, pressed lengthwise, to hide the zipper when it's closed.
- Turn the bag right side out again and zip the zipper closed. Fashion two tubes of fabric (mine were 2" wide and 10" long before seaming) for handles. Slip them into place at each end of the zipper, and sew them into place as you close any gaps between the zipper and the sides of the bag.
- Make two more little tubes (the length of your handle width plus ¼") and sew the two ends to the edges of the back of the bag, near the seam opposite the zipper. The handles will slip through these to fold the bag in half for carrying.
- Now you have two ends of the bag closed. To closed the sides, you can open the zipper, turn the bag inside out, and sew all four layers of fabric together on both sides. This is easiest, but you have a ragged edge on the bag inside. Add bias tape (or just fabric tape, it doesn't need to be bias for such a short, straight seam) to finish the edge if it bothers you.
Labels: sewing
posted by susan at 11:27 PM
![]()


1 Comments:
I have such craftiness envy.
By mandy, at 5:04 PM, September 19, 2008
Post a Comment
<< Home